CHRS Temporary Academic Employment

Temporary Academic Employment
- This new functionality is expected to help streamline the appointment/reappointment of temporary academic employees such as lecturers and ISAs
- Functionality for faculty additional employment will be reviewed to determine if it will be of use to CMA
- Future campus enhancements include the use of the built-in workflow and approvals processes that will help the flow of data from one unit to another and should reduce keying and time to finalize appointments/reappointments
- Human Resources staff will have the ability to do a final approval and push the data into Job, thus reducing their keying as well
Lecturer and Instructional Student Assistant Appointments
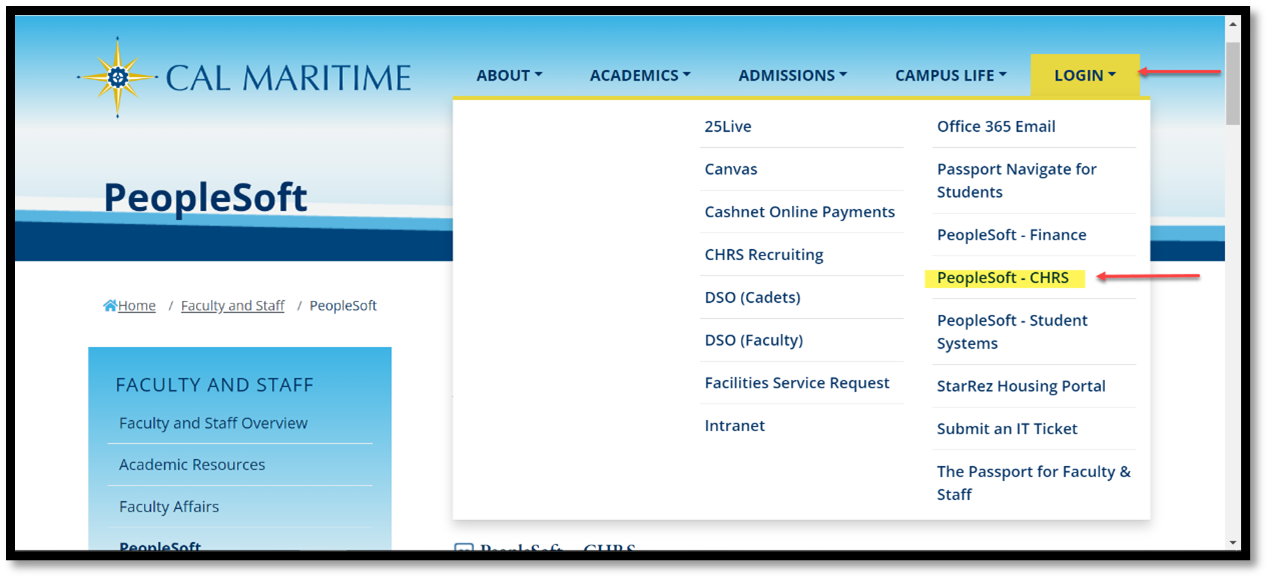
1. Log in to the campus portal.
Open your browser to the Cal Maritime homepage. (www.csum.edu). Select Login and select Peoplesoft-CHRS
Enter your campus username and password. Then click Login.
You will be prompted to authenticate with Duo
2. Use the Nav Bar to access the Menu and select CSU Temp Academic Employment. Then
select CSU TAE Appointment Entry.
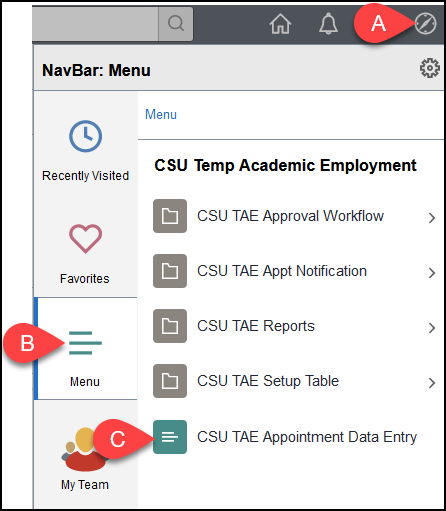
A. Click on the NavBar.
B. Select Menu.
C. Then navigate to CSU Temp Academic Employment > CSU TAE Appointment Data Entry.
3. Enter search criteria to look up one or more employees. You can enter multiple fields to narrow down your search results. Then click Search.
You must enter MACMP as the Business Unit and select an EE Group.

A. REQUIRED: Enter MACMP as the Business Unit. This is a required field, do not remove it.
AND
B. REQUIRED: Select 01 - Lecturers as the EE Group.
C. Optional: Enter the Empl ID (CHRS ID) of the specific employee you would like to
view appointment information for.
D. Optional: Enter a specific Dept ID to see only employees with previous appointments
in that department. If you leave this field blank, you will see employees with previous
appointments in all department IDs that you have access to view.
E. Optional: Select a specific Term (e.g., 2237, 2243, etc.) to view existing appointments
for the selected term.
F. Optional: Select a specific Job Code to view only appointments with that job code.
G. Optional: Adjust the Lookback Dt if you want to go back further in the history.
The default date for this field is 18 months ago.
H. Click Search when you have entered all of your criteria.
4. Use the tools below to view additional information, find specific information, or personalize your view.
Note you can also click on a column heading to sort the search results by that field.
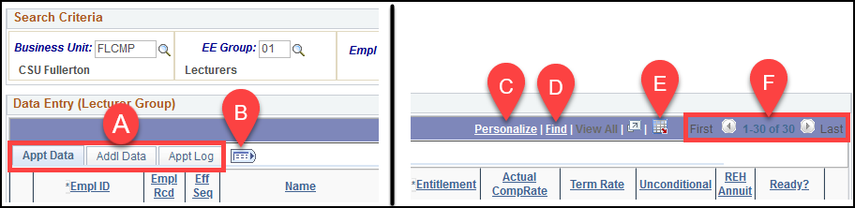
A. Click on a tab to view additional information in the search results.
B. Click on the view all columns tab to display all of the available information in
the search results.
C. Click Personalize to choose which columns you want to include in the search results.
D. Click Find to search for a specific employee in the search results. This will bring the specific
employee top to the top of your search results.
E. Click the download to Excel button to export the results to Excel.
F. Use the navigation arrows to navigate through the pages of results.
5. Review the employee's information and then click on the Empl Stat hyperlink to
review the employee's job history.
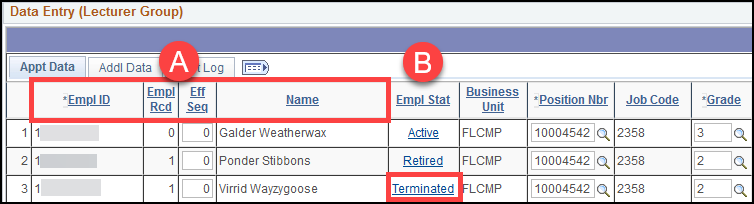
A. Review the employee's information including the EmplID (CHRS ID), Empl Rcd (Employee
Record Number), Eff Seq (Effective Sequence), and Name.
B. RECOMMENDED: click on the hyperlink in the Empl Stat column for an employee to view that employee's
job history, including in other CSUM departments and other CSU campuses as those campuses
roll out CHRS.
You will see the employee's entire job history at CSUM, and as other CSU campuses implement CHRS, positions at other CSU campuses. Click Return when you are finished reviewing the information.

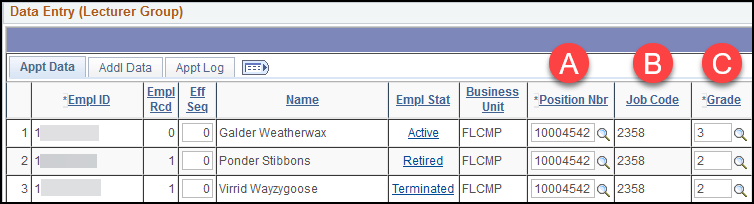
6. Review the employee's position information.
Not sure if the position number is correct? Contact your Employment Services for assistance.
A. Verify that the Position Number is correct for the employee. If applicable, update
the Position Number by typing in the new number or using the magnifying glass to select
a position number.
B. Verify the Job Code for the employee. If the employee is new to the job code, then,
refer to the Add New Person instructions.
- 2358, 2359, 0365, and 0393 are valid job codes for Lecturer appointments.
C. Verify the Salary Grade for the employee. If applicable, update the Grade by typing in the new number or using the magnifying glass to select a grade.
7. Enter the appointment details as applicable.
Other Action and Adjust are most often used when revising an appointment, so more information on these options can be found in the Revising an Appointment guide.

A. Verify the base rate for the employee and update if needed.
B. Enter the Term for the employee's new appointment by typing in the number or using
the magnifying glass to look up a Term ID. Leave blank for monthly appointments.
C. The Session will usually default to 1, but you can type in a session number or
use the magnifying glass to look up a session. Leave blank for monthly appointments.
D. Enter the Appointment Type for the employee's new appointment or use the magnifying
glass to look up available appointment types.
E. If Applicable: Use the Other Action drop-down menu to select an action for the
employee's appointment.
- Do NOT use Termination or Manual Job Load.
- No Change and Short Work Break applies to individuals in an entitlement. It does not apply to semester appointment types.
Add the entitlement unit first, and then the Return Date under the Addl Data tab.
F. If Applicable: Use the Adjust drop-down menu to select an adjustment for the employee's
appointment.
G. The Effective Date will show the effective date of the employee's new appointment.
This is typically tied to the Term/Session that you selected and you can not edit
it.
H. The End Date will show the end date of the employee's new appointment. This is
typically tied to the Term/Session that you selected and you can not edit it.
I. The Multi Term Date will show the end date of the employee's multi-term appointment
if they have an existing multi-year appointment or if you are creating a new multi-year
appointment. If not, this will show the same end date as the End Date field.
8. Use the WTU (Weighted Teaching Units) lookup or the FTE (Full Time Equivalent) lookup to select the appropriate values for the employee. Enter any Entitlements for the employee.
- Depending on the information you have been provided, you can use either WTU or FTE. WTUs and FTEs are linked, so selecting the appropriate WTUs will load the appropriate FTE and selecting the appropriate FTE will load the appropriate WTUs.
- You can only enter valid pay decimals according to PIMS for both WTU and FTE. You can use the magnifying glass to look up valid values if you get an error.

A. Enter the WTUs for the employee's new appointment by typing in the number or using
the magnifying glass to look up an appropriate WTUs.
B. Or enter the FTE for the employee's new appointment by typing in the number or
using the magnifying glass to look up an appropriate FTE.
C. Enter any Entitlements for the employee by typing the number of WTUs that they
are entitled to for the academic year if work is available. Applicable to Appt Types:
003, 014, 015, 016.
D. Actual Compensation Rate will populate for all appointment types.
E. Term Rate will only populate for AY job codes.
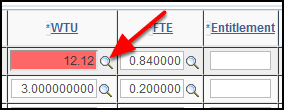
If you get an error when entering a WTU or FTE, click OK.

Then click the magnifying glass next to the field in red (either WTU or FTE).
First, use the drop-down menu next to Total WTU (or Pay Decimal for FTE) to change the operator to >=. Then click Look Up. Select the closest Total WTU (or Pay Decimal) from the search results.
This search will show you all of the WTUs (or Pay Decimals) that are greater than or equal to the Total WTU (or FTE) that you entered, which will allow you to pick a valid value that is close to the WTU/FTE that you entered.
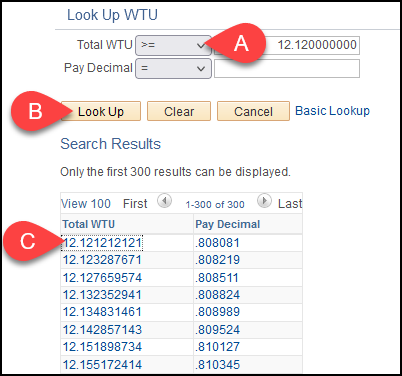
A. Use the drop-down menu next to Total WTU (or Pay Decimal for FTE) to change the
operator to >= (greater than or equal to).
B. Then click Look Up.
C. Select the appropriate WTU or Pay Decimal from the search results.
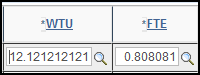
The WTU and FTE fields will update to match your selection.
9. Place a checkmark in Ready? when you have fully reviewed the employee's new appointment information and the appointment is ready to be submitted for approval.
The Ready? column is an easy way for you to remember which employees' appointments that you have fully entered and reviewed. However, it is also a required field in order for an appointment to be submitted. If an appointment does NOT have this box checked, it will not be submitted.

A. If the employee has a full-time, full year appointment, place a checkmark in Unconditional.
B. If the employee is a rehired annuitant, place a checkmark in REH Annuit.
C. If you are submitting multiple appointments for the same employee, place a check
in Diff Appt to create a separate appointment number and appointment notification for the appointment
in this row. If you leave this box unchecked, the multiple appointments will be combined
into a single appointment number and appointment notification.
D. When the employee's entire row has been fully reviewed and is correct, place a
checkmark in Ready?.
10. To save your changes but NOT submit them for approval, click Save for later. To save and submit your changes for approval, click Save & Submit.
Only rows with the Ready? column checked will be submitted if you click Save & Submit.

A. Click Save for later to save your changes without submitting the appointment for approval.
B Click Save & Submit to save your changes AND submit the appointment for approval.
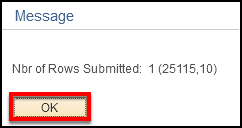
11. CHRS will check the rows for errors when you save & submit. You will see a window indicating if there are any rows with errors and how many rows were successfully submitted. Click OK.
Note that you will not see any pop-up messages when you choose Save for later. You will see a processing icon at the top right of the screen; once the icon disappears, your changes have been saved.
1. Log in to the campus portal.
Open your browser to the Cal Maritime homepage. (www.csum.edu). Select Login and select Peoplesoft-CHRS
Enter your campus username and password. Then click Login.
You will be prompted to authenticate with Duo
2. Use the Nav Bar to access the Menu and select CSU Temp Academic Employment. Then
select CSU TAE Appointment Entry.
A. Click on the NavBar.
B. Select Menu.
C. Then navigate to CSU Temp Academic Employment > CSU TAE Appointment Data Entry.
3. Enter search criteria to look up one or more employees. You can enter multiple fields to narrow down your search results. Then click Search.
You must enter MACMP as the Business Unit and select an EE Group.

A. REQUIRED: Enter MACMP as the Business Unit. This is a required field, do not remove it.
AND
B. REQUIRED: Select 11- ISA as the EE Group.
C. Optional: Enter the Empl ID (CHRS ID) of the specific employee you would like to
view appointment information for.
D. Optional: Enter a specific Dept ID to see only employees with previous appointments
in that department. If you leave this field blank, you will see employees with previous
appointments in all department IDs that you have access to view.
E. Optional: Select a specific Job Code to view only appointments with that job code.
F. Optional: Adjust the Lookback Dt if you want to go back further in the history.
The default date for this field is 18 months ago.
G. Click Search when you have entered all of your criteria.
4. Use the tools below to view additional information, find specific information, or personalize your view.
Note you can also click on a column heading to sort the search results by that field.
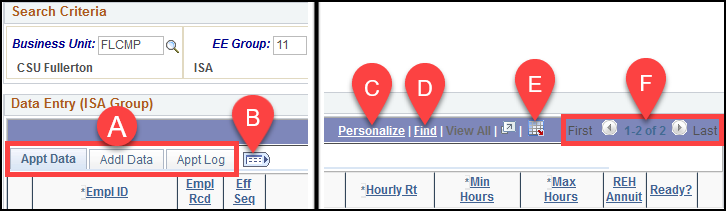
A. Click on a tab to view additional information in the search results.
B. Click on the view all columns tab to display all of the available information in
the search results.
C. Click Personalize to choose which columns you want to include in the search results.
D. Click Find to search for a specific employee in the search results. This will bring the specific
employee top to the top of your search results.
E. Click the download to Excel button to export the results to Excel.
F. Use the navigation arrows to navigate through the pages of results.
5. Review the employee's information and then click on the Empl Stat hyperlink to review the employee's job history.
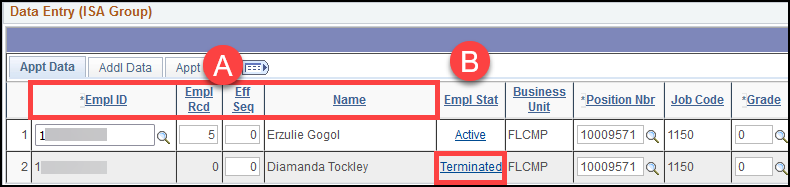
A. Review the employee's information including the EmplID (CHRS ID), Empl Rcd (Employee Record Number), Eff Seq (Effective Sequence), and Name.
B. RECOMMENDED: click on the hyperlink in the Empl Stat column for an employee to view that employee's job history, including in other CSUM departments and other CSU campuses as those campuses roll out CHRS.
You will see the employee's entire job history at CSUM, and as other CSU campuses implement CHRS, positions at other CSU campuses. Click Return when you are finished reviewing the information.

6. Review the employee's position information.
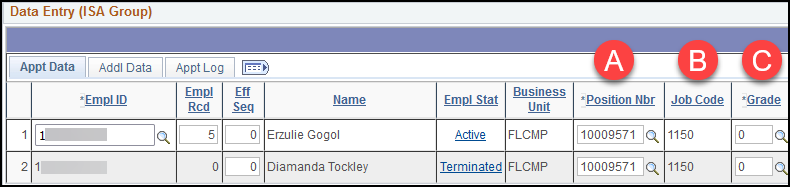
Not sure if the position number is correct? Contact your Employment Services for assistance.
A. Verify that the Position Number is correct for the employee. If applicable, update
the Position Number by typing in the new number or using the magnifying glass to select
a position number.
B. Verify the Job Code for the employee. If the employee is new to the job code, then,
refer to the Add New Person instructions.
- 1150 and 1151 are valid job codes for ISA appointments.
C. Verify the Salary Grade for the employee. If applicable, update the Grade by typing in the new number or using the magnifying glass to select a grade.
7. Enter the appointment details as applicable.
Other Action and Adjust are most often used when revising an appointment, so more information on these options can be found in the Revising an Appointment guide.

A. Enter 002 - 12 Month Appointment as the Appointment Type for the employee's new appointment unless otherwise instructed
by your college or Academic HR Services.
B. If Applicable: Use the Other Action drop-down menu to select an action for the
employee's appointment. Do NOT use Termination or Manual Job Load.
C. If Applicable: Use the Adjust drop-down menu to select an adjustment for the employee's
appointment.
D. The Effective Date will show the effective date of the employee's new appointment.
You can adjust this field as necessary.
E. The End Date will show the end date of the employee's new appointment. You can
adjust this field as necessary.
8. Enter the Hourly Rate that the employee will be paid. Then enter the minimum and maximum number of hours the employee will work per week.
Min Hours cannot be set to zero.
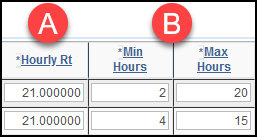
A. Enter the Hourly rate that the employee will be paid.
B. Enter the minimum and maximum number of hours per week the employee will work.
If you get a Salary error, double check that the hourly rate you entered falls between the minimum and maximum specified in the error. Click OK.
As the California minimum wage changes or other salary changes occur, the error message in CHRS will be updated to reflect it.
9. Place a checkmark in Ready? when you have fully reviewed the employee's new appointment information and the appointment is ready to be submitted for approval.
The Ready? column is an easy way for you to remember which employees' appointments that you have fully entered and reviewed. However, it is also a required field in order for an appointment to be submitted. If an appointment does NOT have this box checked, it will not be submitted.
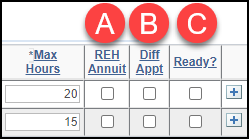
A. Typically the Rehired Annuitant column will not be applicable to instructional
student assistants.
B. If you are submitting multiple appointments for the same employee, place a check
in Diff Appt to create a separate appointment number and appointment notification for the appointment
in this row. If you leave this box unchecked, the multiple appointments will be combined
into a single appointment number and appointment notification.
C. When the employee's entire row has been fully reviewed and is correct, place a
checkmark in Ready?.
10. To save your changes but NOT submit them for approval, click Save for later. To save and submit your changes for approval, click Save & Submit.
Only rows with the Ready? column checked will be submitted if you click Save & Submit.
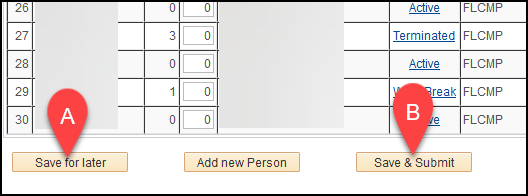
A. Click Save for later to save your changes without submitting the appointment for approval.
B Click Save & Submit to save your changes AND submit the appointment for approval.
11. CHRS will check the rows for errors when you save & submit. You will see a window indicating if there are any rows with errors and how many rows were successfully submitted. Click OK.
Note that you will not see any pop-up messages when you choose Save for later. You will see a processing icon at the top right of the screen; once the icon disappears, your changes have been saved.
TAE Appointment Revisions and Resources
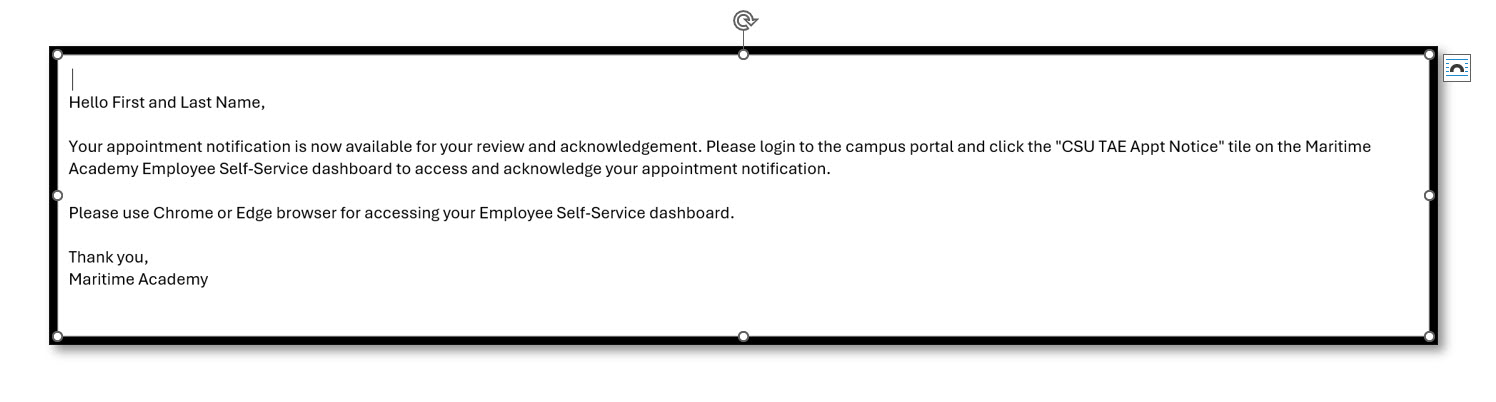
1. You will receive an email in your campus employee email account when an appointment
has been approved for you.
From: NoReply@calstate.edu
Subject: CSU Appointment Notification
2. Log in to the campus portal.
- Open your browser to the Cal Maritime homepage. (www.csum.edu). Select Login and select Peoplesoft-CHRS
- Enter your campus username and password. Then click Login.
- You will be prompted to authenticate with Duo
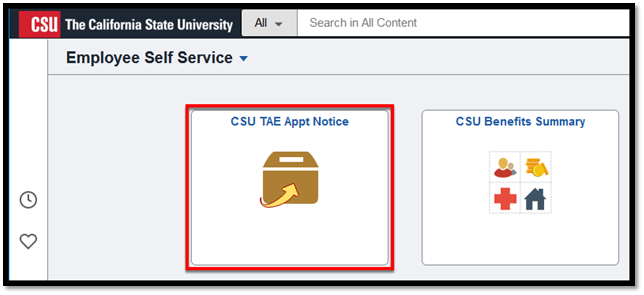
3. Click on CSU TAE Appt Notice on the Employee Self Service homepage.
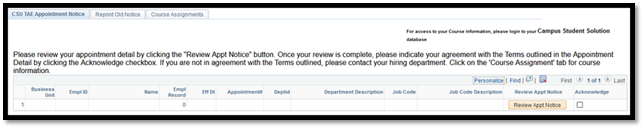
4. You will see your current appointment notices.
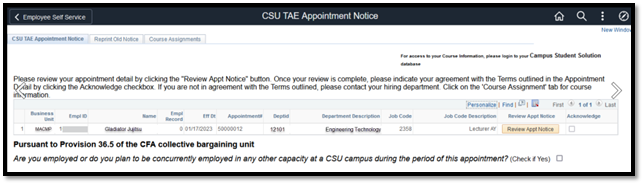
1. Click Review Appointment Notice
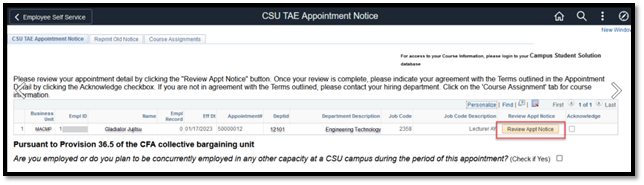
2. Your appointment notice will open as a PDF in a new window/tab. Use the built-in Adobe Reader options to either print or download the PDF.

A. Click on the file download button to download your appointment notice PDF to your
computer.
B. Click on the printer button to print your appointment notice PDF.
3. Close the tab or window with the appointment notice PDF when you are finished. You can click on the previous tab or window to get back to the CSU TAE Appointment Notice screen.

A. Click on the x to close the appointment notice PDF tab or window.
B. Click on the CSU TAE Appointment Notice tab or window to return to the appointment notice screen.
1. Place a checkmark in the Acknowledge column next to your appointment notice.
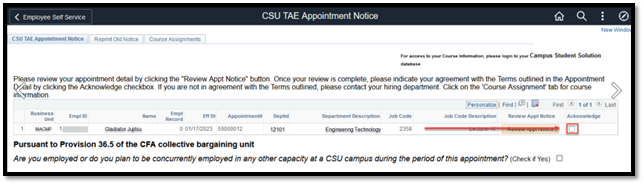
2. The appointment notice has now been acknowledged and it has been removed from your main CSU TAE Appointment Notice screen. You're done!
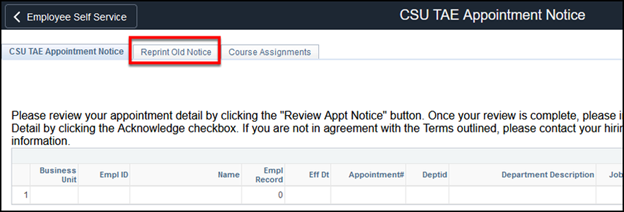
If you don't see an appointment notice on the CSU TAE Appointment Notice tab, you can use these steps to view, print, or download the appointment notice in Reprint Old Notice.
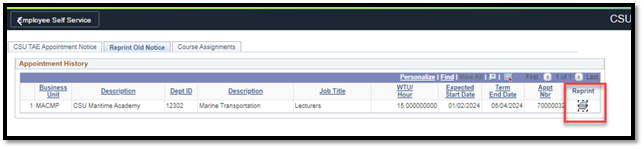
1. Click Reprint Old Notice.
2. Click on the printer icon in the Reprint column next to the appointment notice that you want to view or download.
3. Your appointment notice will open as a PDF in a new window/tab. Use the built-in Adobe Reader options to either print or download the PDF.

A. Click on the file download button to download your appointment notice PDF to your computer.
B. Click on the printer button to print your appointment notice PDF.
4. Close the tab or window with the appointment notice PDF when you are finished. You can click on the previous tab or window to get back to the CSU TAE Appointment Notice screen.
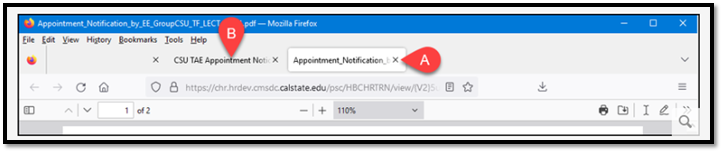
A. Click on the x to close the appointment notice PDF tab or window.
B. Click on the CSU TAE Appointment Notice tab or window to return to the appointment notice screen.
Need Help?
For training and how-to assistance, contact Employment Services at 707-654-1000 or
EmploymentServices@csum.edu
For technical assistance, contact the IT Help Desk at helpdesk@csum.edu